


Construction
1. Subgrade and Subbase Preparation
 Uniformity of subgrade support is a key criterion for placing pervious pavement. As in other types of pavements, truck ruts and other irregularities must be smoothed and compacted prior to placement. Since subgrade and subbase preparation are critical components of pervious concrete pavement performance, refer to Hydrological Design Considerations and Structural Design Considerations for more information. Compaction to a minimum density of 90% to 95% of theoretical density (per AASHTO T 180) is often recommended for consistent subgrade support; however, increasing the subgrade density decreases its permeability. Local geotechnical engineers may be the best source of knowledge regarding the properties of subgrade soils.
Since pervious pavements contain minimal water and high porosity, care must be taken to ensure that the pavement does not dry out prematurely. The subgrade must be moist (without free-standing water) prior to placement, in order to prevent water from being removed from the lower portion of the pavement too soon. This is recommended practice for conventional concrete pavement placement if conditions for high evaporation rates are present, but is even more important in pervious concrete placement because the high voids can allow more rapid drying, with a subsequent decrease in strength and durability, under less extreme conditions.
2. Batching and Mixing
The special properties of pervious concrete require tighter control of mixture proportioning. In particular, the water content of pervious concrete is limited to a narrow range to provide adequate strength and permeability, and prevent the paste from flowing off the aggregates and closing the open structure. A limited paste content means that added water will have a more drastic impact than that experienced in conventional concrete applications. Aggregate moisture level should be monitored carefully and accounted for, as both water absorbed by the aggregate and excess moisture supplied with the aggregate can be detrimental. Contractors and producers must work together to ensure a proper mixture prior to delivery at the job site. On some occasions, slight adjustments to the water content may be necessary at the job site to achieve proper consistency; however, this should be done with care because jobsite additions of water can be difficult to control. The correct water content will provide a mix with a sheen. A unit weight test is necessary to provide assurance of consistent mixture proportions. Unit weights between 100 lb/ft³ and 125 lb/ft³ (1600 kg/m³ and 2000 kg/m³) are typical, and on-site measured values typically are required to be within +/- 5 lbs of the design unit weight.
Aggregate and cement proportions will be established by testing and by experience with locally available materials, as variations in material characteristics (for example, cement setting times, strength development rates, aggregate shape, gradation, and density) will limit the usefulness of “cook book” or prescriptive mix designs. Almost certainly, the mixtures will be stiff. Conventional concrete mixing equipment is used, although mixing times may be extended compared to conventional concrete.
3. Transportation
Because pervious concrete has a low water content, special attention is required during transportation and placement. Its very low slump may make discharge from transit mixers slower than for conventional concrete; transit mixers with large discharge openings or paving mixers tend to provide a faster unloading time. A pervious pavement mixture should be discharged completely within one hour after initial mixing. The use of retarding chemical admixtures or hydration-stabilizing admixtures may extend discharge times to 1½ hours or more. High ambient temperatures and windy conditions will have more pronounced effects relative to conventional pavements, and should be taken into account.
4. Placement and Consolidation
A variety of placement techniques can be used for constructing pervious concrete pavements; as with conventional concrete, placement techniques are developed to fit the specific jobsite conditions. It should be noted that pervious concrete mixtures cannot be pumped, making site access an important planning consideration. Prior to placement, the subbase preparation and forms should be double-checked. Any irregularities, rutting, or misalignment should be corrected.
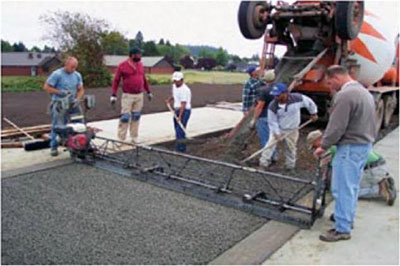
Figure 11. Pervious concrete is usually placed and then struck off
with a vibratory screed.
Each load of concrete should be inspected visually for consistency and aggregate coating. The stiff consistency of pervious concrete means that slump testing is not a useful method of quality control. Unit weight tests provide the best routine test for monitoring quality, and are recommended for each load of pervious concrete. Placement should be continuous, and spreading and strikeoff should be rapid (see Figure 11). Conventional formwork is used. Mechanical (vibrating) and manual screeds are commonly used, although manual screeds can cause tears in the surface if the mixture is too stiff. Other devices, such as laser screeds, could also be used. For pavements, it is recommended to strike off about ½ to ¾ in. (15 to 20 mm) above the forms to allow for compaction. One technique for accomplishing this is to attach a temporary wood strip above the top form to bring it to the desired height. After strikeoff, the strips are removed and the concrete is consolidated to the height of the form. Special height-adjusting vibrating screeds have also been used to provide the extra height. With vibrating screeds, care should be taken that the frequency of vibration is reduced to avoid over-compaction or closing off of the surface, resulting in blocked voids. Edges near forms are compacted using a 1x1 ft (300mm x 300mm) steel tamp (like those used in decorative stamped concrete), a float, or another similar device to prevent raveling of the edges.
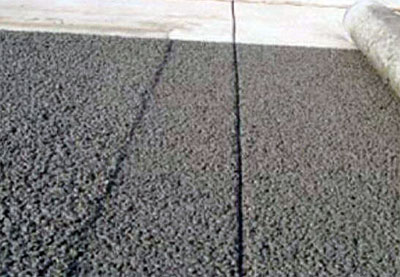
Figure 12.
Consolidation is generally accomplished by rolling over the concrete with a steel roller (see Figures 12 and 13), which compacts the concrete to the height of the forms. Because of rapid hardening and high evaporation rates, delays in consolidation can cause problems; generally, it is recommended that consolidation be completed within 15 minutes of placement.
5. Joint Placement

Figure 13. Compaction of pervious concrete with a steel roller.
Control joints should be placed if prevention of random cracking of the pavement is desired, although the joint spacing is usually larger than for conventional concrete pavements because pervious concrete tends to shrink much less. Recommended joint spacings of 20 ft (6 m) have been suggested, although some installations have had joint spacings of 45 ft (13.5 m) or more without uncontrolled cracking . Prevention of uncontrolled reflective cracking is accomplished by installing joints at the same locations as in the adjoining pavements-- see Figure 12, which shows pervious concrete after screeding on the left and after compaction on the right. Note that the joint is aligned with the previously-placed slab to avoid reflective cracking, and the roller used for compaction is visible on the far right. As for conventional pavements, joints ¼ of the slab thickness provide good control of cracking.
Because setting time and shrinkage are accelerated in pervious concrete construction, joint installation should be soon after consolidation, with a rolling joint tool (see Figure 14). Another technique, suitable for small sections, is to drive a steel straightedge to the required depth with a hammer. Saw-cutting joints is also
possible, but is not preferred because slurry from sawing operations may block some of the voids, and excessive raveling of the joints often results. Removing covers to allow sawing also slows curing, and it is recommended that the surfaces be re-wet before the covering is replaced.
As noted previously, some pervious concrete pavements are not jointed, as random cracking is not viewed as a significant deficit in the aesthetic of the pavement (considering its texture, and has no significant affect on the structural integrity of the pavement.
6. Finishing
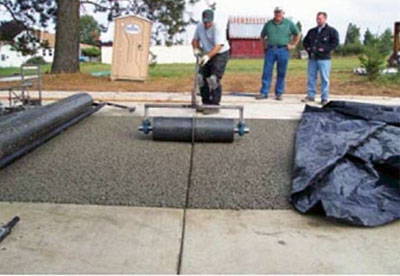
Figure 14. Joint roller, commonly referred to as a "pizza cutter."
Typically, pervious concrete pavements are not finished in the same way as conventional concrete pavements. Normal floating and troweling operations tend to close up the top surface of the voids, which defeats the purpose (for most applications) of pervious concrete. For the majority of pervious pavements, the “finishing” step is the compaction. This leaves a rougher surface, but can improve traction.
7. Curing and Protection
The open structure and relatively rough surface of pervious concrete exposes more surface area of the cement paste to evaporation, making curing even more essential than in conventional concreting. Water is needed for the chemical reactions of the cement, and it is critical for pervious concrete to be cured promptly. In some regions, it is common to apply an evaporation retarder before compaction to minimize any potential for surface water loss.
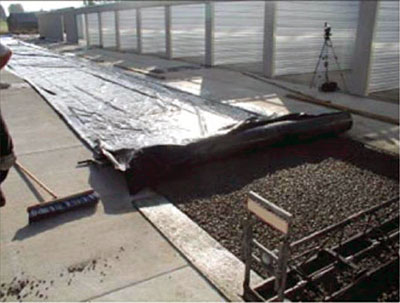
Figure 15. Plastic sheeting should be used to cover the pervious concrete, and should be installed within a few minutes of consolidation to prevent moisture loss.
Because pervious concrete pavements do not bleed, they can have a high propensity for plastic shrinkage cracking. In fact, “curing” for pervious slabs and pavements begins before the concrete is placed-- the subgrade must be moistened to prevent it from absorbing moisture from the concrete. After placement, fog misting followed by plastic sheeting is the recommended curing procedure, and sheeting should remain in place for at least seven days. Using sand or dirt to hold plastic sheeting in place is not recommended because clogging of the voids could result from spillage on removal. Instead, it is recommended to secure plastic sheeting with lumber, rebar, stakes, or other methods.
Curing should be started as soon as practical after placing, compacting, and jointing. Best practice calls for curing to begin within a maximum of 20 minutes after these procedures. High ambient temperatures and windy conditions will have more pronounced effects relative to conventional pavements, and should be taken into account.
8. Opening to Traffic
For pavement applications that will see traffic in service, it is generally recommended that the pavements not be opened to construction or public traffic for seven days. Continuous curing is recommended until the pavement is opened.